Sunday, May 20, 2012

Easy Peasy Lemon Squeezy Cupcakes

My boy has been pestering me for the past 1 week to make a cake together with him. With my culinary skills limited to just cooking instant noodles, I needed an easy way out! Thank goodness we found this 2 minute cupcake mix that we found in Daiso! Time saving and less mess to clean up. Very tasty too - taste just like the topping of mexican coffee bun from the bakery. 

2 minute microwave cupcake (mocha flavor)
1) Beat an egg in a cup
2) Add the cupcake mixture into the egg and stir to mix them completely.
3) Put mixture in a microwave safe cup and then into a microwave for 1.5-2minutes.
4) Voila! Cupcake is ready!
5) Decorate the cake with pre-mixed icing and sugar flakes*.
* Can get these from NTUC or Phoon Huat.


Thursday, July 7, 2011

Gingerbread Boy

Run Run as fast as you can, you can't catch me I'm the Gingerbread Man!

The kids are fascinated by the story of the Gingerbread Boy and its song.  Kammi kept asking if the Gingerbread boy will really jump out of the oven if we were to make him. We gonna prove that he can!

Materials: Pre-packed gingerbread man ingredients from supermarket
Time spent: 20 minutes dough, 20 minutes cutting/ decorating, 20 minutes waiting for them to cool

Gingerbread boys/girls before going into the oven

Kammi's gingerbread girl

Kyler's gingerbread boy

Fresh out of the oven! 
And did they jump out?

YES! Right into the kids' mouths!

Incy Wincy Spider

Incy Wincy Spider


The kids love this song, hence inspired this craft.


Materials used
1) Craft paper - blue (rain clouds), white (lightning, rain drops and clouds), orange (sun),  black (spider)
2) A pair of googly eyes (large)
3) 2-3 black "pipe cleaners" cut into 8 hairy spider legs
4) 4 grey/ brown "pipe cleaners" to be made into spider web
5) Craft glue
6) 2 clothes hangers
7) Sticky tape
8) Crayons/ markers
9) Scissors
10) Strings


Time spent : 40 minutes
Fun: 9/10 Kids loved singing the song and moving Incy Wincy up n down the web!


We drew clouds on the blue craft paper

Our professional Cloud Maker!

Kyler's angry clouds

 We stuck the clouds, lightning, raindrops, Incy Wincy onto an old hanger with sticky tape.
We stuck the black pipe cleaner legs onto the back of the spider body. Also added a brown pipe cleaner to its back. As seen above, stick a small piece of black craft paper over a part of the brown pipe cleaner. Make sure that the spider is still able to move up and down the brown pipe cleaner.

Kyler and Kammi made the happy sun and clouds.
 Incy Wincy is happy climbing up the spout again when the sun is out...:-)

Thunder, rain and lightning! Poor Incy Wincy can't wait to climb down the spout!
(With the clothes hanger, you are able to hang these 2 art pieces on the windows)

Thursday, June 30, 2011

Pirates Ahoy!

Pirates Ahoy!

Kyler was asking me to buy him a pirate hat and sword (dunno what cartoons he has been watching lah). Was thinking to myself : It shouldn't be too hard to make a DIY pirate hat/sword, right?

DIY Pirate sword

Materials:
1) Recycled paper bags - I recommend using the harder and thicker ones
2) Sticky tape and double sided tape
3) Recycled disposable chopsticks
4) Colour craft paper
5) Scissors
6) Aluminium foil

 Kyler's and Kammi's swords (end product)
 Craft Materials
 Stick the chopsticks onto a piece of recycled paper bag
 Cut out the shape of a sword (2 pieces of the same size and shape)
Stick the 2 pieces together (note that the chopsticks are still stuck between the 2 paper swords.)
Cover the "blade" of the sword with aluminium foil and stick the loose ends with sticky tape
Kyler busy cutting up craft colour paper to decorate the "helm" of his sword
 Put sticky tape on the "helm". Then stick the craft paper on both sides of the "helm" 
Add on any embellishments if desired ( A piece of Jewel will be nice!)
My fierce pirate brandishing his swords!

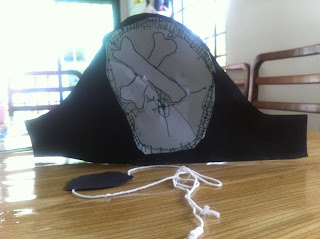
DIY pirate hat

Materials:
1) Black construction paper
2) White/ grey construction paper
3) Black marker
4) Glue
5) String
6) Recycled paper bag
7) Sticky tape

a) Cut a strip out from a paper bag (about 2 inches thick, the length depends on size of the kid's head) 
to make into a headband. Stick the loose ends with sticky tape to make a complete loop
b) Cut out the shape of a pirate hat from the black craft paper and stick it onto the headband
c) Draw a skull and bones on the white craft paper, cut them out, 
stick them on the black craft paper hat 
(**you can clearly tell I didn't help Kyler when he drew and pasted the skull, haha)
d) Cut an oval shape out of the black craft paper to make into a eye patch
e)  Stick the eye patch onto a piece of string


Time Spent : 30minutes on sword and 20minutes on hat
Fun level: 9/10 (he has been playing with this for the past 3 days, and now thinking of making a parrot to go along with this pirate theme PLUS maybe a black/white outfit!)

Tuesday, June 21, 2011

Mosaic masquerade masks (June 2011)

Masquerade Masks


Materials used
1) card board paper (for this I recycled old shopping bags)
2) foam stickers of various colors (for this I cut up left over foam stickers from previous projects). You can also get foam boards from craft shops
3) rubber bands
4) staplers, scissors, double sided tape
5) cotton wool
Materials

Our Masquerader!

Cut out from recycled paper bags (1spectacles and 1 moustache)

Stuck on foam stickers

Stuck cotton wool on paper moustache

Using staple to attach the specs to the moustache

Using staple to attach the rubber bands

TADA! Work done!

1 mask for each tot!

Cost of project = minimal
Time spent = 20 mins each mask
Fun = 8/10.. Kids had more fun wearing the masks to "scaring" their neighbor friends with a loud BOO!

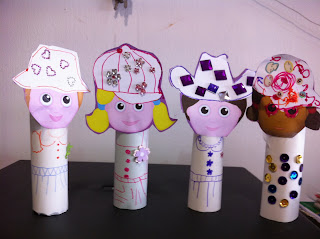
The Toilet Roll Girls (June 2011)

Toilet Roll Girls

Doesn't sound glam isn't it.. haha... but this is the name that Kammi gave to these 4 girls made out from recycled toilet rolls.

With so many kids and adults at homes, we are building up an abundant supply of toilet paper rolls.... Instead of binning them, we can use them to do lots of simple yet fun crafts with the kids....

It was just me and Kammi at home, we decided to do a girl project... We cut out a couple of paper girl heads from an old workbook, then pasted them on top of toilet paper rolls, added some embellishments on their hats, used markers to make some patterns on their clothes.. TADA.....we now have the Toilet Roll Girls, who are (quoting Kammi) "off for their tea party at the Botanic Gardens"...

Materials used
1) Toilet paper rolls
2) craft paper to make the heads of the girls
3) stickers or embellishments
4) markers
5) craft glue and scissors

Cost = Minimal
Time spent = 30 minutes for the 4 girls
Fun = Kammi did have lots of fun after the craft work pretending that the Toilet Roll Girls are doing a tea party
(No prizes for guessing which Toilet Roll Girl was done by Kammi without my intervention.. haha)

欢迎欢迎热烈欢迎 公公婆婆回来!

Welcome garlands and posters for GongGong & PoPo (end April 2011)


We had to pick up the grandparents from the airport. The kids decided they should make some presents to welcome them. 


The kids made some big signs in Chinese that says "欢迎公公和婆婆!”
They also made garlands (all inspired by the Singapore elections, keke).


Materials used for paper garlands
1) paper cupcake holders
2) card board paper (for this I used recycled shopping bags), cut into a 8-10 of circles
3) a long piece of string ( for this I stripped off the strings from shopping bags and tied them to form a long string). Length of this depends on the size of the person wearing this.
4) craft glue


The kids stuck the paper cupcake holders on top of each piece of cardboard circle around the piece of string to form the garland.


Cost = minimal
Time spent = 15-20 minutes


Fun = Kids had more fun putting these around themselves and on their grandparents (vs the hard work)!